Blender Text - Create 3D Text and Render Image
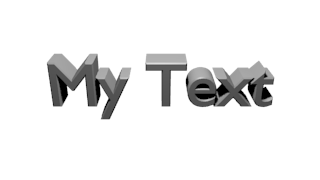
It is simple when you know how but I found it quite a challenge to work out how to create some simple 3D shaded text in Blender. Many of the tutorials assumed too much or were too complicated. This tutorial gives you a step-by-step process for getting some basic 3D text on the screen and rendering an image file. This might be useful for people creating web graphics, logos, video special fx or YouTube intros.
Using the numbers I suggest should get you started. You will need to play around with the camera and lamp position depending on the text you want to use and how you want your 3D text to appear. By following the instructions below you will end up with a project file you can save and use as a template for future work. You will soon be able to create 3D text images in minutes.
Square brackets are used to denote key presses and mouse clicks. For example [RMB] Right Mouse Button and [X] Press the X key.
You will need to know where the 'Render' (camera), 'World' (globe) and 'Object' (cardboard box) icons are located. They should be in the top righthand pane just below the Scene 'tree' of objects.
Let's get started :
- Launch Blender
The default scene should include a lamp, a camera and a cube.
- [RMB] to select default cube
- [X] and then click 'Delete' to delete cube
The scene will now only contain a lamp and a camera.
- Click the World icon and set the 'Horizon Color' to white.
This will give our scene a white background.
- Set View to 'Top' by pressing [NUMPAD 7]
- Use the mouse wheel or press [-] to Zoom out if required so you can see the text, lamp and camera objects.
- On the main menu 'Text' to add a text object
- Click the Object icon
- Set 'Location' to 0,0,0.
- Set 'Rotation' to 90,0,0
- Click the Font icon to access the font properties
- Under 'Geometry' set Modification 'Extrude' to 0.2
- Set Bevel 'Depth' to 0.020
- Set Align to 'Center' under the Paragraph section
The text object should be upright facing the camera.
- [RMB] to select the default Lamp
- Set the Location to 0,-1,4
This will place the lamp between the text and the camera so it will light up the front of the text.
- [RMB] to select the camera object
- Click the Object icon and set location to 0,-5,2.5
- Set the Rotation to 65,0,0 so the camera is facing the text at a slight angle
- Set View to 'Camera' by pressing [NUMPAD 0]
- [RMB] to select the text object
- With the mouse cursor over the viewp press [TAB] to switch to 'Edit Mode'
- Use [BACKSPACE] to delete the existing text and type 'My Text'
- Press [TAB] to switch back to 'Object Mode'
Render and Export
- Click the 'Render' icon to access the output settings
- Select the 'HDTV 720p' preset to give us a resolution of 1280x720
The percent slider under the resolution defaults to 50%. Set it to 100% to ensure we get a full resolution export.
- Press [F12] to render the scene
- Press [F3] to show the "Save As Image" screen
- Set the "Save As Image" file format to PNG
- Browse to a directory and change the default 'untitled.png' filename if required
- Click 'Save As Image' to export the image
- [F11] will take you back to the 3D videw from the Render view

Next Steps
- Change background colour
- Add material and texture to the text
- Change light and camera positions
- Animate the text location and rotation settings
This tutorial was developed using Blender v2.6.2 and uses the default settings.


